Install VMware ESXi 6.x on ASRock N3150/J3160
Introduction
| There are cheap computers with N3150 chipset and Intel Celeron like my ASRock N3150 or J3160 ITX on the market which are energy efficient, small and extremely silent due to passive cooling. So I thought that such a system could be a platform for my personal ESXi server at home, because I do not need a system with very high performance. |

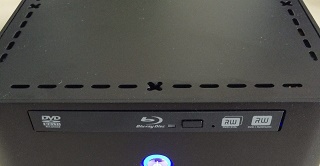
ASRock J3160-ITX
|
Update to ESXi 6.5 tested and it works (see 'hints' in this post)!
		Update available for a J1900 system with quad ethernet LAN.
Read: here Thanks to Johan
But as posted in several forums, this hardware isn’t yet supported by ESXi and it is missing in the official VMware HCL (hardware compatibility list).
I found more than one statement, where someone said frustrated that it is impossible to use ESXi with these boards.
Nelson Mandela said, “It always seems impossible until it’s done.”
So first of all the good news – I made it running!
Read this documentation first and remember to use this information at your own risk, as the config is still unsupported by VMware!
Update July 2016: Intel introduced a new Braswell stepping, the successor to the N3150 is the J3160, which works as well with my custom ISO image.
Update September 2016: Added an instant setup with IPXE for unattended setup in only some minutes!
Update Januar 2017: ESXi 6.5 tested!
Update Februar 2018: Update to 6.5.0 Update 1 (Build 7388607) successful!
Background
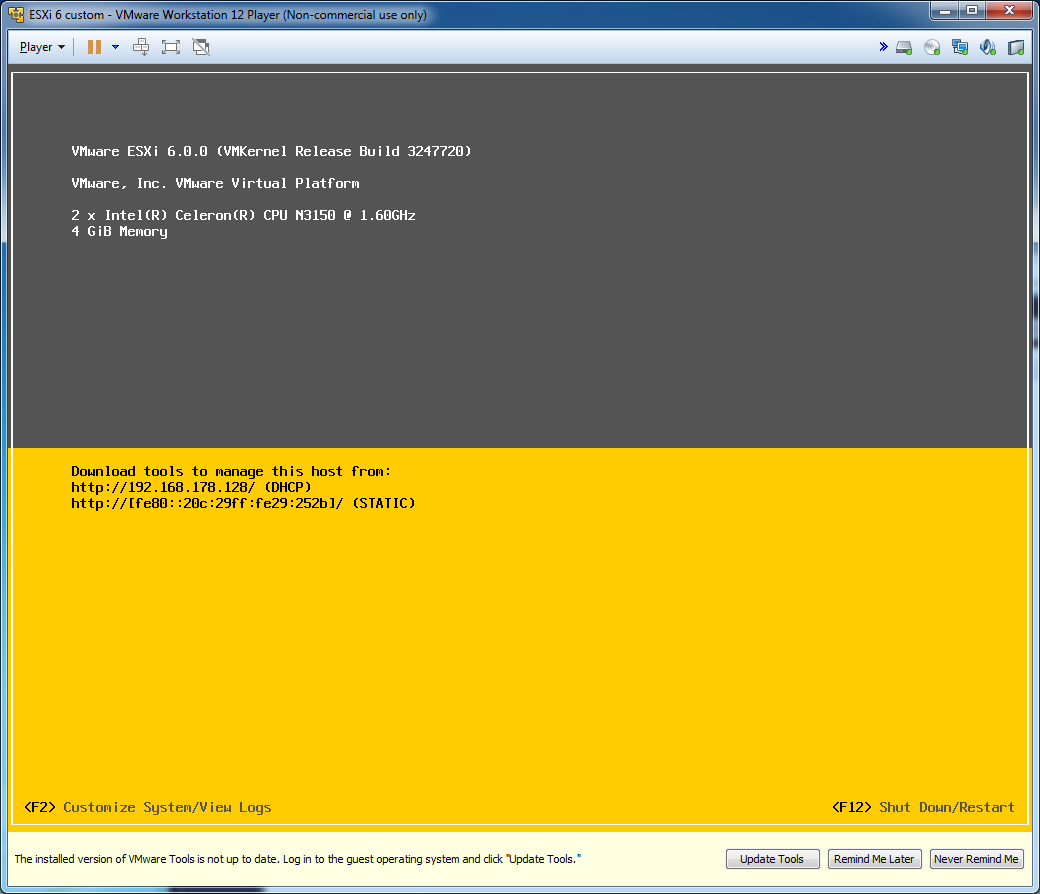
On this platform a standard ESXi installation hangs with a last message “Relocating modules and starting up the kernel” …
I found out, that at this point the ESXI system is already working.
It can be “pinged” but login is failing due to failure completing the installation process (no password set, no management network configured, SSH disabled).
I suggest that the onboard graphics can’t be used by ESXi installer for console and there could be a switch to the serial port console.
Here are some hints from VMware documentation:
Q: What system configuration triggers ESXi to switch its console to a serial port?
A: During system boot up, if ESXi finds No VGA Present or Headless flag set in ACPI FADT table and if there is no user specified change in any of the serial services, the DCUI service will display on a serial port.
Ok, we have an unsupported and “headless” platform without graphical local console.
Give up now or find a solution?
First of all I posted a VMware feature request on their official site to support this platform in the future and in the second step I thought about a workaround for the meantime 🙂
Several ways for headless ESXi installation
Well, I recommend to use option 3 or 4 🙂 |
Option 1 / serial port console
Use the build in serial port, connect another computer with serial terminal emulation via null modem cable. I’ll test this option in the future, at the moment I don’t know if this is working!
Option 2 / PXE unattended install
PXE installation (boot from network) with unattended scripted installation and automatic parameter supply, e.g. as mentioned here:
http://www.geeksecrets.net/pxe-booting-VMware-esxi/
I also didn’t use this option and took option 4 instead.
Option 3 / Use my instant setup with IPXE
**NEW**
I created an easy and very fast way to make an unattended, headless installation of ESXi 6 over the internet in only some minutes – depending on the speed of your internet connection.
Another advantage to option 4:
ESXi can be installed on a harddisk or SSD and not only on an USB stick.
I prefer to use this option.
Please switch to this post to continue: Instant setup (link opens in a new browser tab)
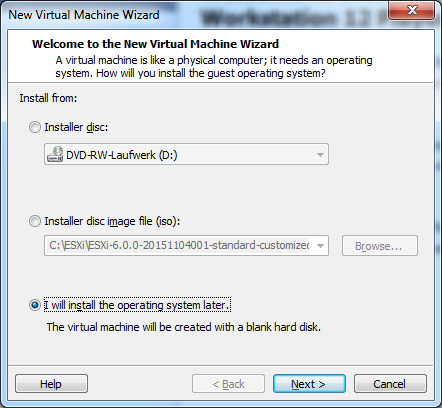
Option 4 / Install ESXi 6 on bootable USB Stick using a virtual machine with VMware player
This was my originally posted way to solve the problem. It is a little bit tricky, but it is working without a serial console or building a PXE environment and without manipulating files. If you want full control over your installation and dislike to install software over the internet, choose this option, otherwise Option 3 is faster and easier.
Installation overview:
- Create a custom ESXi installation ISO file with hardware specific SATA and network drivers
- Make an ESXi Installation on bootable USB Stick using VMware player 12
- Boot this installation in VMware player, set a password, customize management network, etc.
- Plug in this ready customized stick in your ESXi Host, setup boot from USB in BIOS and boot it
- Manage your system via VSphere Client or SSH (the local console is not available)
- Setup virtual machines, stop, reboot, add license key and customize ESXi via VSphere Client
Important:
- Your system will be booting from USB stick (make a backup)!
- Direct console (DCU) is not available!
Note: Use local console DCU functions via SSH if needed.
The workaround step by step
My ASRock system came preinstalled with Windows 7, 64 bit, so I used it to prepare the bootable ESXi stick. I took a 16 GB stick, but less storage (8 GB) is also possible.
Step 1 / Custom ESXi ISO Image
First of all I made a custom ISO file with “ESXi 6.0, update 1” with added drivers for SATA and Realtek LAN RTL8111 – this is the network card built in the ASRock N3150 board (works with J3160 as well).
Use the download box in the post for option #3 to get a download link for my custom ISO files or read this chapter to make your own image.
With my custom ISO file you can skip this step and continue with step 2.
I used “ESXi Customizer power shell script” from http://www.v-front.de. Thanks to Andreas Peetz .
Additional for building process, I had to download and install the free VMware VSphere PowerCLI from VMware download site. I used “VMware vSphere PowerCLI 6.0 Release 3”.
Details for building custom ESXi installation ISO can be found here:
|
ESXi / Install unsupported SATA: ESXi / install unsupported NIC: Online depot for drivers: https://vibsdepot.v-front.de/wiki/index.php/Welcome Driver Realtek LAN RTL8111 for ESXi 5.5 und 6.0 in depot: The command to create custom ISO with SATA and network support: for my board: Perhaps the build in hardware can be used with standard installer ISO from VMware, but I took the safe way and made this ISO. If you want to use my custom ISO file, feel free to contact me or use my last uploaded file. |
Step 2 / ESXi Installation in VMware Player virtual machine
Overview:
I found out, that it is possible to install ESXi inside a VMware Player virtual machine (double virtualization)!
This is not performant, but can be used to override the VGA graphics problem. This “double virtualization” will be used for installation only. After a successful installation, the system boots directly.
I used VMware player 12, which is free for private nonprofit use.
ESXi need a 64 bit environment, e.g. install the Player on Windows, 64 bit.
A minimal virtual machine for ESXi can be configured with 2 processor cores and >= 4 GB RAM.
I took my destination system for this step. The advantage is that the final hardware will be used. This increases the chance that the USB boot stick will work.
Hint: Some people had problems with USB 3.0. Use one of the USB 2.0 (black) ports!
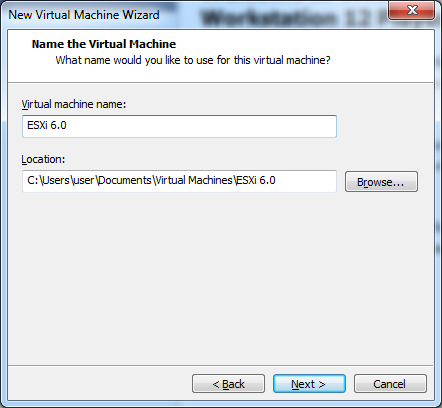
VMware Player / create a virtual machine for ESXi:
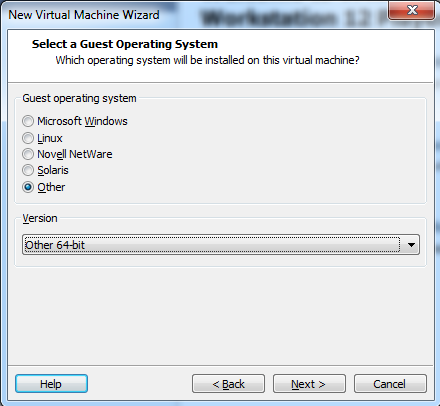
Note: It is important to use “Other->Other 64-bit” – not Other->Other !
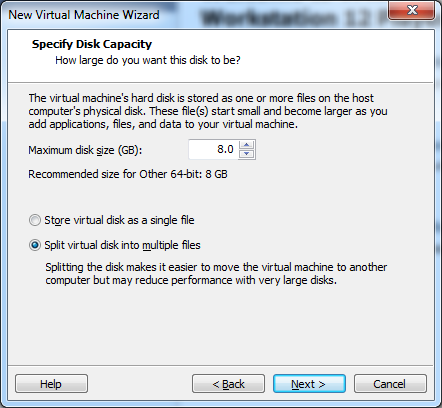
Disk size doesn’t matter, because we’ll install on USB Stick
Press “Next”, then klick on “Customize Hardware”
Add at least two processors (cores) and >= 4 GB (ESXi 6 minimum)
Add an USB controller to map the installation USB media into the VM guest system. Insert a blank USB stick, start the VM, mount the stick into the VM and install ESXi on that stick.

Step 3 / Customize ESXi parameters
Remove installation ISO from virtual CD/DVD
You have to use a utility bootloader ISO to boot from USB stick, because at the moment VMware virtual BIOS can’t boot directly from USB.
Infos and download here:
http://www.howtogeek.com/97923/how-to-boot-a-VMware-virtual-machine-from-a-usb-drive/
https://www.plop.at/de/bootmanager/download.html
You’ll need the small ISO file “plpbt.iso”
Modify your VM:
Insert „plpbt.iso” into the virtual CD/DVD

Start the virtual machine, check that the USB stick is connected to the VM using the top right menu in VMware Player and choose USB as boot option in bootloader. The installation program is starting, choose the USB stick as destination media for ESXi server software.
When prompted, press F2 to customize your system.
Setup your management password, IP address, network mask and default gateway for management network. If desired, enable SSH in “Troubleshooting Mode Options” for later remote console support.
F12 / F2 –> Shutdown ESXi Server virtual machine
Step 4 / Start your physical ESXi Server from USB Stick
Change the Boot Options in computer BIOS on your physical host machine.
Switch it to “boot from USB”
Reboot your server, install VMware VSphere on your management computer and login via VSphere Client to ESXi.
Although headless, the ESXi shell can be used for exceptional usage:
http://kb.vmware.com/selfservice/microsites/search.do?language=en_US&cmd=displayKC&externalId=2004746
The “direct console (DCU)” is not working on your server video output, but can be accessed via SSH (if you enabled it).
Start putty or another ssh-tool, connect to your ESXi Server and enter the following commands:
export TERM=linux
dcui

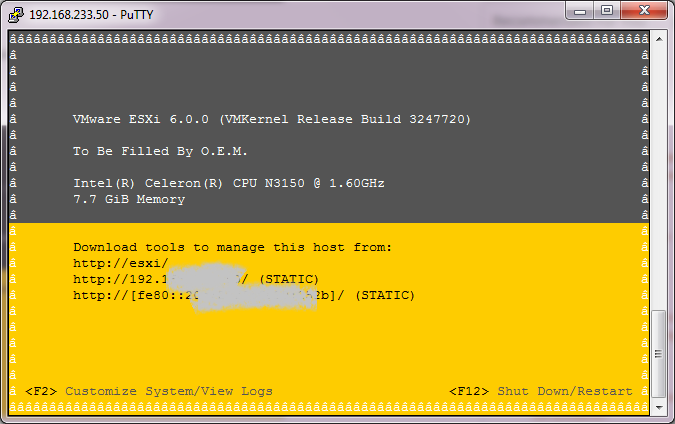
ESXi console via SSH
Step 5 / say hurray 🙂
Now you have a working ESXi server.
Enter your license key using VSphere Client as usual, add storage (local SSD/Harddisk and/or NFS-storage e.g. on QNAP-NAS), configure your system, add virtual machines, …
Don’t forget to backup your USB stick and your virtual machines periodically!
A really good free backup script for ESXi is ghettoVCB: http://www.virtuallyghetto.com/2015/05/ghettovcb-vib-offline-bundle-for-esxi.html
Remember once more that you use this unsupported config at own risk!
This post was updated several times and will be updated periodically in the future.
Feedback welcome.
Antonio Jorba
Update 2017-02-28:
Additional hints for updating ESXi to Version 6.5:
If you update your ESXi 6 to ESXi 6.0U2 or to ESXi 6.5, there is an embedded host client included, to manage the system via browser.
Look here, how to update easily to 6.5: https://tinkertry.com/easy-upgrade-to-esxi-65If you use my newer image as described in option #3, the embedded host client is already included, but currently this is update 6.0U2 and not 6.5, so use the tipps above to update to 6.5.
If you use ghettoVCB to backup your VMs, check that it is running after performing the update.
Download custom ESXi 6 ISO file:
I have added my current custom ISO file in my second post, which describes option #3 (instant setup).
Here is a direct link to the download box in that post: https://mobiletiger.jorba.de/instant-esxi-installation#downloads (will open in new browser tab)
The software is made by VMware Inc. Please respect their copyright and license rights. I’m not responsible, that the software is working in any way nor that your data is save on your system.
Please post technical questions and informations with a reply at the end of this page.

How did you find the ip address after you plug usb in N3150
message:I have 5 port in the new computer,thus I can not find the ip or port the esxi assigned. do you have any tool suggest for finding the ip?
Well, you can do at least two things :
In step 3 configure a – previously unused – static IP – Adreese , subnet mask and default gateway in your network and outside of the DHCP range .
Or simply look at the network table in the router management when using dynamic IP addresses ( DHCP ) . There is a dynamic table with MAC < - > IP assignments
.
If you set a fixed IP address, you have to set all the following parameters :
IP address , subnet mask , default router , and DNS ( Domain Name System ) .
Example:
Your default router uses internal IP address : 192.168.178.1
Netmask : 255.255.255.0 ( Class C )
DHCP – Range is 192,168,178,100 to 192,168,178,200
Previously unused IP address for ESXi is 192.168.178.50
DNS and default gateway = 192.168.178.1
Netmask : 255.255.255.0
IP fpr ESXi = 192.168.178.50
Thanks, it worked, my motherboard is Asus N3050I-C 4GiB RAM
Works like a charm! Thanks for the clear instructions. Have an Asrock N3700-ITX running. Has an 11W power consumption in combination with a PicoPSU.
I received many e-Mails with ideas and questions.
Three hints:
1. On some boards with less than 4 GB usable RAM the ESXi 6 system outputs a false error message “no network card found”, but too less memory is the real problem.
2. N3150 boards don’t have a VT-d feature. Therefore it isn’t possible to use the hardware passthrough feature. Message: “host does not support passthrough configuration”
3. NAS systems (e.g. QNAP) with NFS support can be used for ESXi storage if there is too less internal space or if SATA isn’t recognized.
Thank you very much Antonio for this tutorial! Can you post some feedback about the stability of the system?
@Marco: My system is running very stable. It is ultra silent computer (no coolers, no hard disk) and it is energy efficient. These facts were important for me. Remember, the N3150 isn’t listed on the vmware hardware compatibility list (HCL). Just use it as a small home server.
Yes, of course this was the purpose that I was thinking about. Not a work/production environment, just a home lab. But in the meantime I don’t want to go with a system not able to run stable even for my testing use. Thanks for your feedback!
… with pleasure.
I do not understand anyway why the system isn’t officially supported by vmware, because it is really suitable for home usage.
Hello, Antonio!
Just want to say, that I’ve successfully start ESXi 6.0 on my J1900! 🙂
I created a new virtual machine in VMware Fusion 8 on my iMac mid. 2011 with i5-2400s, dedicate 8Gb of RAM and 4 CPU cores to VM.
My SSD was attached to VM through USB dock and installation of ESXi was on this disk.
After reboot I’ve attached plpbt.iso and boot from SSD on USB, enable console and SSH for remote management and configure network.
For SATA controller to work, I have removed Sata-xahci v.1.33 and installed new version 1.34, but in list of installed VIBs it shows that it is still v.1.33, so just update not worked for me, only remove and install new one.
After that I’ve attached SSD to SATA port on MB and boot from it, install esx-ui from SSH and got access to my new ESXi node with working datastore! 🙂
С уважением,
Рогов Алексей
Please upload your iso
ISO file, scripts can be found in my other post:
https://mobiletiger.jorba.de/instant-esxi-installation/
Search there for “files download link box”
It’s amazing!
I installed ESXi 5.5 on my laptop(4770HQ) a few weeks ago,and I found an interesting thing.
I tried to passthrough Intel HD Graphic,I was curious what would happen.
After reboot, the screen freezed at “Relocating modules and starting up the kernel”,while ESXi was running background normally.
I guess that ESXi starts passthrough PCI devices when “Relocating modules and starting up the kernel”,so the graphic card is “unplugged” at that time.
After receiving my custom ISO file SENY has sent some questions to me via e-mail.
I think they are generally important, here they are:
> Hi,
> Installation completed, After the computer starts, screen display “Relocating modules and starting up the kernel…”,No response
> Test Add “ignoreHeadless=TRUE” problem is still…
> May I ask what is the problem? thank you
Antonio:
Well, this message is normal. Please look at my above article. The direct console (DCU) is not available with these boards, because the graphics adapter is not recognized by ESXi. You have to use VSphere Client and/or SSH console to manage your server. The VSphere Client can be downloaded at the vmware site, for SSH access use “putty” from here: http://www.chiark.greenend.org.uk/~sgtatham/putty/download.html
I don’t think, that the unusable direct console is a real problem, because almost all servers in datacenters are “headless” (without direct console) and the output on the ESXi console is not very exciting 😀
The main problem is the first installation and customization, because your ESXi server needs a working management network (IP address, netmask, gateway), a root password and SSH enabled. I took “option 3” to preset these settings.
Look here, I copied out some important text from my article:
Option 3 / Install ESXi 6.0 on bootable USB Stick using a virtual machine with VMware player
This is a little bit tricky, but it is working without a serial console or building a PXE environment.
Installation overview:
–> Create a custom ESXi installation ISO file with hardware specific SATA and network drivers (e.g. my ISO file)
–> Make an ESXi Installation on bootable USB Stick using VMware player 12
–> Boot this installation in VMware player, set a password, customize management network, enable SSH, etc.
–> Plug in this ready customized stick in your ESXi Host, setup boot from USB in BIOS and boot it
–> Manage your system via VSphere Client or SSH (the local console is not available)
–> Setup virtual machines, stop, reboot, add license key and customize ESXi via VSphere Client
Important:
–> Your system will be booting from USB stick (make a backup)!
–> Direct console (DCU) is not available!
Note: Use local console DCU functions via SSH if needed.
Hi you.
I see that you install esxi on USB and using this to boot on your motherboard. That mean the ESXI still in USB. How can I use this way to install esxi in my hdd. Thanks
It is not a real problem to boot ESXi from USB stick, because the ESXi system is small and it is rare to shutdown or reboot the host system. From USB stick the system is booting in a few seconds.
Instead of installing on a stick a second HDD can be used as well.
The HDD from where VMware player is running can’t be used, because you can’t saw off the branch on which you sit 😉
One other question: I have a SSD attached to my Asrock N3150 motherboard. I guess I could also use the same procedure to install to the SSD instead of to an USB stick right?
-Frank
you need a second HD or SSD, see the reply to Jame
Taking the ovvwriee, this post hits the spot
I am happy you having a great time. When you are talking to people about your trip and stuff do you tell them about your blog and the reason why you are doing it? With all of the items you are starting to acquire you are going to need a separate room. Don’t ever get rid of the things you get from this trip. No matter what keep this stuff. Don’t ever sell it, keep it all.
I sooo remember Richard Scarry’s Busytown from when I was a kid. My own kids loved his artwork, too. Oh, that is so neat that your daughter sees you in that role and announces it with such pride. I don’t blame you one bit for wanting to re-read that book just to hear her support and faith. Thanks for swinging by.
I think the effect of such action will be to encourage more Jews to rise up against Israel and it’s policies. The more Jews do this the louder the voice against the Zionists will become.
"Mack, do you EVER disagree with field? And why must you always attack LAA, shithead? You are always dancing and jigging for Field. and you are shameless about it. You are an ass-kisser and a loser….shamelessly pathetic."See, I knew if I made that post, I'd get a response like this. Like clockwork.I'll decline arguing with you about how disagreeing with LAA automatically makes one an "ass-kisser," "loser" or "shithead."
fantastic issues altogether, you simply won a brand new reader. What might you suggest in regards to your post that you just made a few days in the past? Any positive?
First an FYI – Ive been running VMs on Windows 10 with hyper-v very successfully, including the use of remote FX. So if anyones wanting to get a hyper-visor up and running with minimum effort on this motherboard perhaps thats the way to go.
However, Id love to get ESXi installed, could I have a link to the ISO please?
N3150 esxi it’s ok now…..https://www.4kb.com.cn/p/15.html
hi, is this solution works on n3150dc-itx motherboard?
the dc version use DC-In Jack and has SO-DIMM memory slots :
http://www.asrock.cn/mb/Intel/Q1900DC-ITX/index.asp
thanks!
sorry, that web page i just posted is incorrect. i can’t find the right one.
Just look here:
http://www.asrock.com/nettop/Intel/Beebox%20Series/index.us.asp
Asrock beebox home theater PC or similar system with n3150 SoC Intel Braswell CPU.
Works like charm on my brand new ASRock N3700-ITX. Thank you very much for your detailed description. 🙂
Hello,
This solution is exactly what I was looking for . Can you please share the link for download iso at the email that I entered above in the form.
– I was wondering what is the IP address of the installed image?Is it the ‘fpr ESXi = 192.168.178.50’ that you mentioned above?
– Can I restore this iso image to a SATA drive instead of a USB drive?
Thanks again for your time & valuable contribution.
ESXi 6.0u2 confirmed working on Beebox N3150.
Mucho thanks for your guide.
Dear Antonio,
First of all big thanks for your effort to share the instructions with us!
Unfortunately i didn’t manage to succeed myself to properly install ESXi 6. I spend a lot of days now to do so and read many articles on how to create a ESXi 6 iso with the right drivers in it. I managed to create a new ISO with the previous PS tool but still installation get stuck on the famous part :). Can you please send me your link so i can try this as well.
Now i have MS Hyper V running but i don’t like that.. this is also a hassle to do this in a workgroup environment :), but we learned a lot (hahaha) from all these practices.
Many thanks for your cooperation!!
Regards,
John
Note for readers needing the custom ISO file, please contact me via e-mail using the form at the end of the above article.
Hi Antonio, it worked for me on a Gigabyte BRIX-GB-BACE-3150! Only way for me to get it done was by installing ubuntu lts 16.04 on the brix and setup the VMWare player environment on a usb 2.0 stick. With windows 10 on the Brix the installation hangs at the plpbt.iso; the USB option gives a failure. Tried support for 1.x/2.0 and 3.0. It was a usb 3.0 stick first.
1 question though; does it make a difference if I select 2GB or 4GB ram in the initial process?
Thnx for your great tutorial!
Onno
ESXi 6 requires a minimum of 4GB of physical RAM. It is recommended to provide at least 8 GB of RAM to run virtual machines in typical production environments.
ESXi 5 had lower RAM requirements.
See VMWare ESXi Dokumentation: http://pubs.vmware.com/vsphere-60/index.jsp#com.vmware.vsphere.install.doc/GUID-DEB8086A-306B-4239-BF76-E354679202FC.html
If there is too less available RAM some users found out, that ESXi is giving false error messages, like “no network adapter found”.
How neat! Is it really this sielpm? You make it look easy.
Wowwowwow, Vix. This is my favourite post of yours ever <3.Your mum had such an amazing style and it's wonderful to have so much history of your family. I don't even have any pictures of my dead grandparents!Ah I adore you for still remembering the label of the jumpsuit on your 13th, I barely even remember what I wore on mine!! (that picture is my new hairspiration. i'm saving up for a crimper!)Haha I love how your mum used the soap dish as an ashtray, that's something that my step-da would do. She looks loads like you!x x x
Opa! Não é o estilo que eu costumo escutar, mas achei bacana. Espero que a banda vá conquistando reconhecimento e não desanime (no começo é mais difÃcil conseguir “espaço”)\\o/p.s.: fiquei curioso pra saber o porquê do nome Caravella
The genius store called, they’re running out of you.
Yeah that’s what I’m talking about baby–nice work!
WE SHOULD PRAY ALWAYS.JESUS STARTED AND ENDED WITH PRAYERS.PRAYER IS THE MASTER KEY.AS WE TURN OUR EYES UPON JESUS AND LOOK IN HIS WONDERFUL FACE,ALL THE THINGS ON EARTH GOES STRANGELY DEEM IN THE LIGTH OF HIS GLORY AND PRAISE.mc hammer sang: YOU HAVE TO PRAY JUST TO MAKE IT A DAY,SO PRAY…
Alors moi je savais même pas qu’on pouvait gagner de la caillasse en bloguant. Celà dit, je suis pour la version « on continue for free and for fun juqu’à l’épuisement ». ( si tu parles d’épuisement physique, bin faut juste dormir un peu desfois. Si c’est de l’épuisement des sujets à bloguer, tant qu’on arrivera tous a faire marcher un ou deux neurone, il est pas prêt d’arriver…) )
J3710-ITX run ESXi 5.5 OK~
… I got mails where I was asked how to find the IP address after installtion and I got some information, that there are problems with USB 3.0 sticks.
1. IP-Address:
You have to configure the management network at the end of the installation process.
My custom ISO file is the ESXi 6 standard installation media enhanced by network and sata drivers for N3150 / J3160 boards.
So you can use my ISO to run the installation process, but first read my article in detail.
At the end of ESXi installation three things have to be done by you:
–> configure the management network (ip address, netmask, router, dns)
–> setup the password for root access
–> enable ssh (for console access)
This things are very important to use your ESXi 6 system after installation.
These cheap boards are SoCs – this means “system on a chip”. The built in graphics isn’t VGA compatible and so normally the setup procesure will fail after printing out “relocating modules”. I found out, that only the console fails, but without tricks it isn’t possible to finish the installation (… to configure network and password).
I described three ways to escape from this problem. The most simply solution is No. 3 in my post.
I use a VMWare Player under Windows to install the ESXi from my custom ISO file on an USB stick in the first step.
In a second step you have to boot this stick under VMWare player to finish installation and to configure IP, network and password.
At the end, if all these steps are done, the USB stick can be used to boot the ESXi natively without VMWare Player. The console can only be used with ssh (putty), The whole system can be administrated with VMWare VSphere Client.
Please read my article in detail to get it up and running, because there are some hints, for example for the second step when booting the USB stick under VMWare player.
2. USB 3.0 sticks and USB 3.0 ports
I also had problems using the USB 3.0 ports in a J3160 system for booting a USB 3.0 stick on a friend’s system.
Solution: We just used one of the USB 2.0 port (black) for the USB boot stick.
Hi Antonio,
Thanks for your efforts!
I am at almost the end of the guide but Im not able to mount the usb to the ESXi’s VM.
I got this error message: “It is not safe to connect ‘Toshiba DataTraveler 2.0’ to this virtual machine. In general, USB mice and keyboards appear as PS/2 devices and should not be connected as USB peripherals. USB devices containing files in-use by the running virtual machine cannot be connected to the virtual machine. See the product documentation for more information.”
Could you give me a hint, how to proceed forward?
Thanks,
Bob
Hi Bob,
did you use the menu “VM > Removable Devices” in VMWare Player to connect the USB stick ti the ESXi virtual machine?
At which step are you exacly? Have you already done a successful installation inside the VM to the USB stick?
Or do you try to install the ESXi software from my ISO file and the stick isn’t there inside the VM?
Hello, could you give me your iso image with integrated drivers, I would try a j3160, Greetings.
… link to ISO file was sent via E-Mail.
@all: Please use E-Mail Contact form at the end of the article to receive the download link.
Hello Antonio ! Thank you for your solution. But I’m doing something wrong. Could you give me your esxi iso image with drivers?
Thank!
Thanks Tony!
It work with ASRock J3160DC fanless ITX, with 8 GB of RAM and SATA hard disk. I used SATA-USB adapter and Virtualbox VM
… ok, this are good news. Thank you for your feedback Vincenzo (molto gracie).
The facts:
–> Virtualbox can be used instead of VMWare Player for “double virtualization”
–> J3160 systems are able to run ESXi
Here is the italian site from Vincenzo:
http://www.vincenzov.net/taccuino/Virtualizzare/ESXi_tips.htm
Hi I read that it is possible to get esxi working on a asrock.j3710m with the iso you made. Can you please send me the link for the iso so I can use this and try to get it working.
… ISO-Download-Link has been sent via e-mail to Leo.
Hello,
please also send me the link to the ISO ESXi server.
Thank you,
Mic
Link to the ISO-file was sent by e-mail.
Due to the properties of the software by VMware, Inc. I can’t publish the ISO files directly on this website.
In the article I described how to add the drivers to an official installation ISO and it is an option, that I sent a download link to inviduals, if you ask for it via e-mail. In this case please don’t use publish, contact me via e-mail form..
Hi Antonio, i got a asrock J3160 itx, trying to install ESXI 6, please send me the download link for your ISO, thanks a lot
Tested using the v2 ISO, works like a charm!, i have connected a mini PCI-e network card, which can be detected as well.
I see interesting posts here. Your blog can go viral easily, you need some initial traffic only.
You should read about bucksflooder , this might interest you.
DNS and default gateway = 190.190.190.1
Netmask : 255.255.0.0
IP fpr ESXi = 190.190.190.195
Thanks
If you choose my prefered option 4 – Install ESXi 6 on bootable USB Stick using a virtual machine with VMware player – the management network (IP, gateway, mask, DNS) will be entered by yourself during installation. So, there is no need to post this data
I think esxi stuck will not start, the original is just a problem, the background has been running.
I have used your method to test the installation on the USB, which is feasible and can be activated and connected to the. But there is a problem, esxi tips can not be written to the storage, I do not have to install storage devices, but USB should be able to write ah, next week to test installed on the SSD, see the results, very grateful for your help
Today a blog reader named János asked my by e-Mail:
Can I use a harddisk or SSD as destination for ESXi instead of installing on USB stick?
Antonio:
Of cause you are able to install on a second HDD instead on USB stick. I’ve never tried it, but it should work. An easy way is to connect the destination SSD in a temporary USB cover (USB to SATA adapter) to the computer.
János:
Finally!!! It’s working!
So, there are a few things which has to be considered before doing as I did it.
1. If you dont have USB enclosure, you can use SATA too. But when you attach the disk in VMware Player, then use IDE, otherwise the installer doesn’t recognize it.
2. Doesn’t matter the partition as far there is just one on the destination disk.
3. Use “entire disk” option when attaching the disk to VMware. Using existing partitions will give you “No hypervisor found. ” error.
It took almost 5 hours with trying, but now it works. Thank you Antonio!
Thank you again Antonio. Your work here is a real treasure for everyone!
Outstanding! I used this process to install ESXi 5.5 to an SD card, and am booting a Zotac ZBOZ CI323 NANO with this solution, console be damned. Thanks for the documentation!
Hi Antonio.
I have tried what you describe and tried your instant setup, but after dhcp is configured I choose “Wipe complete first disk/Install ESXi”… after that the computer reboots and everything starts again.
What am I doing wrong?
Perhaps no driver for HDD.
Please try the other option wirh the double virtualisation. Wirh that you can see all steps and read the messages
Greetings.
could you give me your iso image with integrated drivers for ASROCK J3160DC-ITX.
Thanks.
& I would suggest if you can post pic of your j3160dc box. that will b gr8.
Hi, yes, of cause.
The ISO image file is linked in the download box on my blog in the article “Instant ESXi installation”: https://mobiletiger.jorba.de/instant-esxi-installation/
Direct link to the ISO file is here: http://www.jorba.de/esxi/ipxe/ESXi-6.0.0-20160804001/ESXi-6.0.0-20160804001-standard-customized.iso
Please look at this 2nd post, as this is a easier and faster way to install ESXi (over the internet).
A computer’s photo from a testet J3160 system is stored at the beginning of this post, at chapter “Introduction”. Just klick on it to get a larger image.
Antonio
Thanks for your quick reply. I have successfully installed ESXi via ISO link on SSD Drive.
Just few questions below if you can help me out.
1. Instead of lan, I have connected Wifi card via USB for Internet connectivity. is there any way that ESXi & VMs can be accessed over Wifi.
2. I have J3160DC-ITX Box, does it have any issues with power, if I add more harddisks.
3. As per hardware specifications, I believe ‘passthrough’ will not work. So is it affecting lot for Xpenology VM.
4. Which is better for VMs – Proxmox 4.3 or ESXi on platform – J3160DC
Thanks for such a great topic. & lloking forward for your blog posts on Installation of Xpenology VM under ESXi.
First of all, I’m glad to hear, that ESXi is up and running on your system.
Your questions:
1. Wifi instead of Ethernet: I don’t know any USB Wifi adapters that are supported by ESXi. One way could be a Wireless Ethernet Bridge, which is connected to LAN port on your system.
2. Issues with power: This depends from your PSU (power supply unit). SSDs need fewer power than normal harddisks. I use two SSDs without problems.
3. Xpenology VM: I apologize, but , but I have no detailed experience with that NAS emulation software. I use Plex multimedia server at home with my N3150, the video files are stored on a remote NAS – and streaming works without problems, although there is no pass-trough support, so I think it depends on the speed, that you need. Just give it a try 😀
4. Which is better, Promox or ESXi?
Well this is a “matter of taste”. Much more systems are running ESXi and there are many extensions, documentations, addons, ready to use VMs, tipps and tricks for ESXi. On the other hand, Promox is based on QEMU and is open source. QEMU uses dynamically translation of processor instructions. This are very different approaches, so it is difficult to compare 😀
I personally prefer ESXi and use QEMU for interprocessor-emulation, e.g. emulate Raspberry Pi with its ARM processor on an Intel machine.
5. Nice idea to build a selfmade NAS with a VM on these N3150/J3160 ESXi Systems. Perhaps I’ll try this in the future. At the moment I have same “hardware” NAS systems, that do their job.
This evening Johan has sent me a real great success story..
After hour experimenting with drivers and ISO files he got this system up and running:with method 4:
Qotom 4 port ethernet J1900 device.
http://www.qotomchina.com/product/60437722094-221388310/Fanless_4_Lan_mini_pc_Qotom_Q190G4_baytrail_J1900_X86_home_router_systerm.html
Do you know if you can use a j1900 in an existing cluster with EVC support? I current have a e3-1245 v5 rig and would like to add a Qotom j1900 as a second, extremely low power, second node.
No Idea, sorry.
I have a N3160 system and testet the steps on N3150/J3160-systems, without EVP.
All J1900 tips are from blog visitors.
On these J1900 systems, it seems to be harder to implement ESXi, as you can read here. To get them running with EVC support would be a callange. They are not listed in any hardware compatibility guides from vmware, e.g. here: http://www.vmware.com/resources/compatibility/search.php?deviceCategory=server
Perhaps some visitors have some experience with EVP on J1900 oder other Intel Celeron boards?
hi,
i am using method 3
booting from a small USB stick 1GB, and a harddisk attached to my 3150
wanted to be sure, that the install will be done on the HDD
its now at the screen : relocating ….
but how long do i need to wait? its there already for 15 min? 🙂
if i reboot and unplug the usb, i see nothing installed,
if i reboot with the usb stick, same install process
so how long +- do i need to wait at the relocating modules screen? is it going to reboot after wards?
tnx
if
If this isn’t working, try onother method or as some other visitors said:
Put the harddisk (SS) into another computer. Install ESXI on this HDS and swap back to your orig. System
yes, tried method 4 now, seems to be working
i can boot from the USB stick now, my esx is running
but, i also attached an HDD to that n3150
when i goto esx UI , i cant see the hdd, so i cant add the hdd as a datastore? its visible though in my bios?
what is the cause of that?
also when i install the esx not on a usb disk, but directly on a ssd disk, can i use that same ssd also as a datastore?
thnx
after reading some post, i think i need a custom iso disk with sata drivers in it? see my previous post, can you send me that iso file for n3150 and sata support?
thnx
For ASRock N3150/J3160 systems and similar, there is a custom ISO file here in my blog for downloading.
Please see the “download files link box” on my other post here:
https://mobiletiger.jorba.de/instant-esxi-installation/
Hello,
Thanks for creating this guide!
When attempting the network boot I encounter an error message:
“Error loading http://www.jorba.de/esxi/ipxe/ESXI-6.0.0-20160804001/iso/s.v00
Compressed MD5: 15d49b222c78ce5d512d2ale577a6b1a
Decompressed MD5″ 0000000000000000000000000000000
Fatal Error: 10 (out of resources) ”
Thank you!
Well this is not a problem with that file, the file isn’t corrupt.
The installation was made for N3150/J3160 systems, not for J1900 or other systems. I think you have incompatible hardware, e.g. graphics or quad ethernet?
Just read the other entries and posts here in my blog, some readers have solved similar problems:
2. Instant installation:
https://mobiletiger.jorba.de/instant-esxi-installation/
3. J1900 with quad ethernet:
https://mobiletiger.jorba.de/install-vmware-esxi-5-5-6-successfully-on-qotom-j1900/
Option 1 is definitely doable so long as your video works far enough to edit the boot string. I haven’t tested it on my j1900 board yet as my current one is in use as debian and my new one is on its way.
I used an hp 4000 sff pc I had laying around and was successful at installing 6.5 via serial. You may need to add ignoreHeadless=TRUE to the boot string as well.
Connect null modem cable to host and launch putty with 115200,8,1,none
Boot host from iso.
When esxi installer shows “Loading VMware ESXi” screen, hit Shift+O to edit boot options and append this: gdbPort=none logPort=none tty2Port=com1
continue the install. It will put some stuff on the host monitor and some should start spewing on the putty window. Eventually the server’s display should go blank and the installer “GUI” should appear in your putty window.
Complete the install via the putty window.
On reboot it will default back to the host video card. You can either hit Shift+O again and add the lines or just look it’s IP up via your dhcp server.
Connect vsphere client.
open configurations, software/advanced settings
expand vmkernel and then boot
set vmkernel.boot.logport and vmkernel.boot.gdbport to com2
set vmkernel.boot.tty2port to com1
click ok and reboot.
This should persist the redirecting of console to serial.
You will also likely need to add ignoreheadless=true permanently as well which can be done via exi CLI of your choice: esxcfg-advcfg –set-kernel “TRUE” ignoreHeadless
verify with esxcfg-advcfg –get-kernel ignoreHeadless
Thank you Trent for these important hints. I’ve tried to use the serial console for headless installation without success on my N3150 system, so this tips may be very useful for our readers here.
Antonio
My motherboard (q1900b-itx) arrived today. If everything goes well, I’ll update instructions and I may even toss down a video of the process.
I realize (now) this page is centered around the n3150 systems. Honestly, google must have brought me here initially due to the “Update available for a J1900 system” note. I didn’t notice at the time. I can post it on the linked page if you prefer.
Hello
I’ve been trying to get a system https://www.amazon.ca/gp/product/B01D7UK7WK/ref=msg_ctr_lk_pdt running, but I’ve been having what seem to be nic issues. I can see the nic trying to be initialized, but it seems as though the initialization fails, as the green link light on the nic doesn’t illuminate and it doesn’t get an ip through DHCP.
I’ve used Antonio’s disk image and the PXE image with the same result. I also tried it on a ASROCK N3150 with the same failure.
If I take the SSD I installed the image on and put it in a haswell box (i7 4790) it boots up OK and works well. I made sure all of the VDMKs are up to date (I upgraded the CPU microcode and the SATA VDMKs)
I made sure VT-d and NX/XD are enabled in the bios of both N3150s. I think I must be missing something very basic in a bios setting. I have tried the default bios with VT-d and NX/XD enabled. I tried disabling UEFI settings and putting everything in legacy mode. I disabled the sound card and serial port. I tried the boot flag ignoreHeadless=TRUE.
I know Antonio’s install is working, so I would appreciate anyone giving me some suggestions.
Here is a list of the pci devices in the box:
ubuntu@ubuntu:~$ lspci
00:00.0 Host bridge: Intel Corporation Device 2280 (rev 21)
00:02.0 VGA compatible controller: Intel Corporation Device 22b1 (rev 21)
00:13.0 SATA controller: Intel Corporation Device 22a3 (rev 21)
00:14.0 USB controller: Intel Corporation Device 22b5 (rev 21)
00:1a.0 Encryption controller: Intel Corporation Device 2298 (rev 21)
00:1b.0 Audio device: Intel Corporation Device 2284 (rev 21)
00:1c.0 PCI bridge: Intel Corporation Device 22c8 (rev 21)
00:1c.1 PCI bridge: Intel Corporation Device 22ca (rev 21)
00:1c.2 PCI bridge: Intel Corporation Device 22cc (rev 21)
00:1f.0 ISA bridge: Intel Corporation Device 229c (rev 21)
00:1f.3 SMBus: Intel Corporation Device 2292 (rev 21)
01:00.0 Ethernet controller: Realtek Semiconductor Co., Ltd. RTL8111/8168/8411 PCI Express Gigabit Ethernet Controller (rev 06)
02:00.0 Ethernet controller: Realtek Semiconductor Co., Ltd. RTL8111/8168/8411 PCI Express Gigabit Ethernet Controller (rev 06)
03:00.0 Network controller: Qualcomm Atheros AR9485 Wireless Network Adapter (rev 01)
ubuntu@ubuntu:~$ lspci -nnk | grep -iA2 net
01:00.0 Ethernet controller [0200]: Realtek Semiconductor Co., Ltd. RTL8111/8168/8411 PCI Express Gigabit Ethernet Controller [10ec:8168] (rev 06)
Subsystem: Realtek Semiconductor Co., Ltd. Device [10ec:0123]
Kernel driver in use: r8169
02:00.0 Ethernet controller [0200]: Realtek Semiconductor Co., Ltd. RTL8111/8168/8411 PCI Express Gigabit Ethernet Controller [10ec:8168] (rev 06)
Subsystem: Realtek Semiconductor Co., Ltd. Device [10ec:0123]
Kernel driver in use: r8169
03:00.0 Network controller [0280]: Qualcomm Atheros AR9485 Wireless Network Adapter [168c:0032] (rev 01)
Subsystem: AzureWave Device [1a3b:1186]
Kernel driver in use: ath9k
ubuntu@ubuntu:~$ lspci -nnk | grep -iA2 sata
00:13.0 SATA controller [0106]: Intel Corporation Device [8086:22a3] (rev 21)
Subsystem: Elitegroup Computer Systems Device [1019:9af1]
Kernel driver in use: ahci
Well Kaspar the Realtek NICs sometime make trouble and you have two of them
Did you try to connect both interfaces to your router and looked there to see some IP address assignment?
You wrote that your system has a dual NIC:
01:00.0 Ethernet controller: Realtek Semiconductor Co., Ltd. RTL8111/8168/8411 PCI Express Gigabit Ethernet Controller (rev 06)
02:00.0 Ethernet controller: Realtek Semiconductor Co., Ltd. RTL8111/8168/8411 PCI Express Gigabit Ethernet Controller (rev 06)
The RTL8168/8111/8411/8118 driver was included in my original ISO image, but in the meantime there is an update at vfront, so I’ve built a newer ESXi 6.5 image today, which is not tested (!), but can be downloaded here:
https://esxi.jorba.de/esxi65-iso.zip
My production N3150 system is in use and I do not want to overwrite some data, so please test it yourself.
I took the newest vfront customizer script with the following command:
ESXi-Customizer-PS-v2.5.ps1 -v65 -vft -load net55-r8168,net51-r8169,sata-xahci
Here is the log:
.\ESXi-Customizer-PS-v2.5.ps1 -v65 -vft -load net55-r8168,net51-r8169,sata-xahci
This is ESXi-Customizer-PS Version 2.5.0 (visit https://ESXi-Customizer-PS.v-front.de for more information!)
(Call with -help for instructions)
Logging to C:\Users\xyz\AppData\Local\Temp\ESXi-Customizer-PS-6284.log …
Running with PowerShell version 5.1 and VMware vSphere PowerCLI 6.0 Release 3 build 3205540
Connecting the VMware ESXi Online depot … [OK]
Connecting the V-Front Online depot … [OK]
Getting Imageprofiles, please wait … [OK]
Using Imageprofile ESXi-6.5.0-20170104001-standard …
(dated 01/06/2017 04:23:48, AcceptanceLevel: PartnerSupported,
For more information, see http://kb.vmware.com/kb/2147871.)
Load additional VIBs from Online depots …
Add VIB net55-r8168 8.039.01-napi [New AcceptanceLevel: CommunitySupported] [OK, added]
Add VIB net51-r8169 6.011.00-2vft.510.0.0.799733 [OK, added]
Add VIB sata-xahci 1.39-1 [OK, added]
Exporting the Imageprofile to X:\ESXi\ESXi-6.5.0-20170104001-standard-customized.iso‘. Please be patient …
Hope it helps – please post your results here …
Hello Antonio
I appreciate your response. I seem to be having a problem with the file. I’m getting an error that the zip file is empty. There may have been a problem during compression. I’ve downloaded it twice and it still gives the same error. I’d appreciate you trying again, as I’d like to test it and post the results. As you suspected, I did not have both nics connected at the same time. I did try both separately with reboots in between. Even with both nics connected at the same time, the esxi 6.0-v2 iso did not work on this box.
I should have been more clear with my response. With both nics connected, neither one lit up the green link LED, and the DHCP server did not get a discover from either mac.
Hello Antonio
I have spent quite a bit of time on this box trying to get ESXI to work. I wanted to give it a try since I like player so much. I gave up and installed KVM. I appreciate your efforts and site. I’ll use your image on the haswell box with an i350t4 when I finish with the braswell.
Regards
Kaspar
Corrected file uploaded (zip was wrong due to size limitations).
Link is the same:
https://esxi.jorba.de/esxi65-iso.zip
Please remember, this file is not tested.
I have a problem lately for exsi 6.0.0. The main normal welcome screen is missing which is the no.10th picture above. My main screen is black and there are two descriptions on the lseft top of screen,which first is “ESXI 6.0.0 http://www.vmware.com” and second is “Copyright (c) 2007-2015 VMware, Inc.”. I can access to system by putty and vsphere client but I can’t operate the server. So how to get back to normal screen?
You are able to use the server console via SSH
1. Login via putty (ssh):
2. Enter the following commands
export TERM=linux
dcui
Picture see here: https://mobiletiger.jorba.de/wp-content/uploads/2016/01/ESXi-DCU-via-SSH.png
Or if you update your ESXi 6 to update 2 or newer, there is an embedded host client included, to manage the system via browser.
Look here, how to update easily: https://tinkertry.com/easy-upgrade-to-esxi-60u2
If you use my newer image as described in option #3, the embedded host client is already included.
Thanks. The main reason for the missing welcome screen was the server stayed in some special setup. I enter maintenance mode via vsphere client and reboot the hardware, then the server get back to normal.
Thank you very much!
Hello Antonio!
Thanks for this nice post, I was really looking forward to installing ESXi on my J1800. Following your tutorial worked 100%! I confirm that it works also on the J1800.
I still not ok after install it in windows with vmplayer then I boot the USB from 0 and still not able to boot it up why? anything I missed?
i found a problem on my j1900 , must “Enable Execute Disable Bit in System BIOS” , otherwise , the esxi can’t boot , wish this can help another one
Thank you ken chan for this hint.
yes~ you are right. but this still working in esxi6.5 . only 6.0
not working in esxi6~
thank you so much Antonio. i have use your iso no problem with my j1900 itx motherboard. no need any customize. it’s work!! there are rtl 8111gr NIC ASMedia ASM1061 sata controller.
i will plug in a new intel nic later.because this motherboard only one nic.it’s good news for j1900 user. cheers
i have try 6.0 and 6.5 iso. 6.5 not working for me j1900 itx motherboard. (6.0 work perfect,and i update to 6.5 failure )i think this maybe driver problem. i can not ping my esxi ip when the nas started.i search around,and i find this https://kb.vmware.com/selfservice/microsites/search.do?language=en_US&cmd=displayKC&externalId=2137851
because the ESXi-Customizer method not work for esxi6.5 anymore(i confirm it in chinese forum)
http://bbs.vmsky.com/thread-57902-1-1.html
so can you make a new iso by this method Antonio? thank you ~
Hi yi gong,
I didn’t use the ESXi Customizer to create my images, as it isn’t supported any more.
I used this here instead, which is working with 6.x versions:
https://www.v-front.de/p/esxi-customizer-ps.html
This is a newer power shell script.
<< ESXi-Customizer-PS is a Powershell script that greatly simplifies and automates the process of creating fully patched and customized ESXi 5.x and 6.x installation ISOs using the VMware PowerCLI ImageBuilder module/snapin.>>
I think you have driver problems or hardware incompatibilities. The images work on ASRock N3150/J3160 systems.
ok~ i got it. i think esxi6.5 not work perfect with nic drivers for me.give up, back to esxi6.0~
Another success for a Asrock N3700 board.
The update from 6.0U2 to 6.5 was a no brainer thanks a lot!
Did anyone try to install osx on their Braswell ESXI?
how you update to 6.5? can you give me the link.thx.
https://www.vladan.fr/how-to-upgrade-esxi-6-0-to-6-5-via-cli-on-line/
or look here:
https://tinkertry.com/easy-upgrade-to-esxi-65
Pls use these external links at your own risk, don’t forget backups.
thanks very much~ bro
Hello,
works on 2 Nodes.
After the GA of Esxi 6.7, I tried to Update it without success.
Any plans tp ugrade it to 6.7 ?
yes, it is planed, but I’m in no hurry with it. First, wait and see what is reported in the forums 😉
Thanks so much 6.5 up and running on N3000, also +1 for 6.7 🙂
I’m in trouble with esxi 5.5 pr 6 or 6.5 with my J1900 4 ports, once done the usb to boot esxi there’s a kernel message and don’t startup.
Can you please help me?
Many thanks , Francesco
First of all try the second ethernet port, as described by Johan in this blog:
“So this was the real trick: not the first ethernet port of the Qotom device is activated after an ESXi install, but the SECOND ethernet port is.”
Additionally please look into your router, if your system is alive and get the ip address for administration: https://
I’ll send you more tips by email
Antonio
due to domain rearrangement, I updated some links for file download
Crazy, did this last night and it worked, was in putty did the export thing and also could access the web gui.
Next day shut of the system, changed usb port and was going to place the device at correct location.
It wouldent work, hmm ohh right it booted into my SSD instead of usb.
Tried boot to usb, got secure boot not enabled even tho it is, after some reboot and swap the usb back to old port it was secured enabled.
But I can never ping the device or access GUI
I even formated the usb stick and followed the guide again, not working anymore. Weird it worked first time.
Any ideas?
Well,, first of all, this is a some years old post. Newer ESXi versions do not have the VGA graphics problem and have fewer security flaws.
For the concrete problem, do not use secure boot in BIOS, switch to an USB 2.0 port, use another Stick with capacity about 16 GB (not too big)