 |
Install VMware ESXi 5.5 / 6 successfully on Qotom J1900
This is a post sent from my friend Johan from Netherlands. |
From: Johan, Netherlands:
Just like the ASRock N3150 there are a lot of cheap computers based on the Celeron chipset.
I happened to find and buy one in China, based on the earlier Celeron J1900 chipset.
http://www.qotomchina.com/product/60437722094-221388310/Fanless_4_Lan_mini_pc_Qotom_Q190G4_baytrail_J1900_X86_home_router_systerm.html
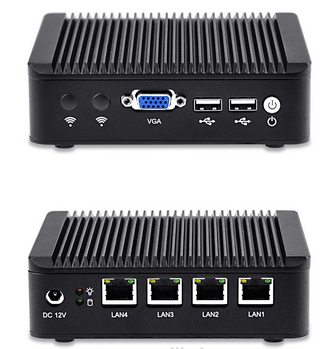
The Qotom system has four gigabit ethernet ports (based on an Intel chip), 8 Gb of RAM and 120 Gb mSata drive and passive cooling.
This is an ideal system for a small firewall appliance. My intended target was install ESXi to run Sophos XG UTM and pfSense (ipv6) virtual machines on it.
And yes, I knew that this hardware is not on the compatibility list of VMware.
When first trying to install ESXi 5.5 I hit the dreaded “Relocating modules and starting the kernel” message and seemingly nothing happened.
After a few tries gave up on the ESXi idea, and installed Sophos XG UTM on it. (worked like a charm for a few months)
Then I found this blog (and some new inspiration). Option 3 (IPXE) seemed like the best solution, but it failed with an CRC error. In hindsight, this is probably caused by the mSATA drive. After contacting Antonio he gave me some new pointers, this gave me some new inspiration to keep on trying.
Then I tried Option 4 using the modified ISO of ESXi 6 Antonio sent me.
Installed it on a USB stick using VMWare workstation. I did configure four ethernet ports in the VM, just like the real Qotom system.
Booted the Qotom system (after setting the BIOS to legacy and setting the USB stick as the primary boot device) and the device seemed to boot, but still got the “Relocating modules and starting the kernel” message. But no indication if anything was working.
I had a look in my HP smart ethernet switch that the Qotom system was connected to, but it listed no new MAC address being registered at the switch.
So there I was, having learned a lot, but still no working system.
As a sort of last resort, I started moving the Ethernet cable from one port to the next.
And suddenly when I plugged in the SECOND port a new MAC addres was registered at the switch.
It appeared that this was a MAC address from VMware (probably as a result from the VMware workstation installation)
Opened the newly assigned IP address and there it was: the ESXi 6 status page, success!
I could even managed it using the new web based user interface.
So this was the real trick: not the first ethernet port of the Qotom device is activated after an ESXi install, but the SECOND ethernet port is.
Since I used ESXi 5.5 for other (test) systems in my home I did it all from scratch again, using my own modified ISO of ESXi 5.5.
Installed PowerCli, set the ExecutionPolicy: Set-ExecutionPolicy -ExecutionPolicy Unrestricted
Downloaded the ESXi Comtomizer script and created my ISO using:
.\ESXi-Customizer-PS-v2.4.ps1 -v55 -vft -load net55-r8168,sata-xahci,net-igb
This creates a ‘slipstreamed’ ESXi 5.5 ISO with some additional modules. Sata-xahci is needed to recognize the mSATA drive.
Using this ISO I installed it on a USB stick using VMWare workstation, and booted the resulting USB stick from the Qotom system.
Of course this time the second ethernet port was attached to my network switch.
Succesfully opened the assigned IP address in the vSphere Client and could see ESXi 5.5 running happily.
Hopefully this is useful to other readers with a similar J1900 based system.
Let me conclude by thanking Antonio very much for all his quick reply’s and extensive pointers. I would never have persisted without them.
Thank you very much!
——-
Best regards,
Johan

So while this post was helpful it didn’t get the job done for me. I bought the same machine because I have deployed it before as a pfSense/Unifi controler box for a relative. It has great potential but really lacks support.
When I found this post I was hopeful of creating my esxi deployment for my router/home lab but none of the methods worked for me, although I didn’t try the 4th option from Antonio’s post. I wanted it installed on the 1tb HDD that came with it. iPXE booting wouldn’t work after several times using both my own iPXE boot file and Antonio’s. This unit doesn’t have the serial port so I skipped that. I tried every combination of scripted install to no avail, I thought it was installing because there was a lot of disk activity but it never worked.
So I spent most of my day Saturday trying different thing’s to get around the “no graphics driver support” that makes it impossible to install this. If you don’t have a mSata drive, the HDD drivers on the standard ISO are fine, also the intel NIC drivers work. If you do have mSata you’ll need to build your own ISO(as I did) to include the drivers(joahn describes this).
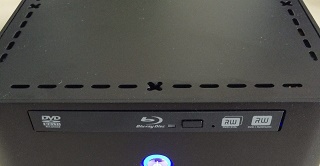
So what finally worked? I have an Intel based desktop that I work on daily, and I thought “well esxi doesn’t require installing specific drivers, they all come pre installed in the ISO and at boot it decides what drivers to use, what if i stick the disk in my system and install then put the disk back?” 20 minutes later I had a working system!
So for those of you who spend a while to get this working, if you dont mind cracking open the side of your desktop and moving the disk over for a few minutes this was a quick and easy way. I have a hot swap bay that made it even easier for me but still this only took a couple minutes of time off. Just make sure you configure admin access and your interfaces before you remove the disk and put it back in the Qotom box.
Hope this help’s
Jon
Thank you Jon for sharing your solution. This post here was sent to me by Johan, Netherlands. The Qotom box seems to be tricky with ESXi.
I’ve never owned such a system and the main solution I described on two other posts on this blog were made on N3150 / J3160 ITX Braswell platform computers.
But nice to know, that a simple harddisk swap solves the problems 😀
Anybody has been able to successfully upgrade to ESXi 6.5 on the Qotom Q190G4 (J1900)?
I had it running smoothly under ESXi 6.0, but when I upgraded to 6.5, I lost (network) access to it. I have even tried a clean install with 6.5, but it didn’t work as well.
Been trying to get it working with 6.5 for the past 2 days, but I’m clueless now. Any hints or tips?
Fabio
Hi Fabio,
I asked Johan, who made this initial post.
Here is his answer:
Sorry, don’t have any experience with 6.5 (and only installation experience with 6.0)
If I look at depreciated (network) drivers in 6.5, I don’t see any clues. ;(
https://kb.vmware.com/selfservice/microsites/search.do?language=en_US&cmd=displayKC&externalId=2145810
Did Fabio try plugging into different ethernet ports? The eth device numbering might have changed.
There might be another port bonding to the management interface. (just like I found out)
Best regards,
Johan
Antonio… thanks for asking Johan about it. Indeed I had already tried plugging into all 4 ethernet ports and, unfortunately, this also didn’t work. I have also looked at the driver mapping on ESXi 6.5 (inside the NET_E100.V01 VIB) and the Device ID for the NIC is still supported.
I’m trying to record boot logs to the USB drive (to see what may be happening) but I haven’t got much success with this yet. When using the USB drive plugged to the VM, it records the logs in the drive, but when I connect it directly to the Qotom mini computer, no logs are recorded. Unfortunately I haven’t had much time to play with it this weekend.
Have you upgraded your ASRock N3150/J3160 to ESXi 6.5 yet? If so, how did it go?
Regards,
Fabio
Also wenn ich das richtig verstanden habe, kann ich die Standard ISO nehmen, wenn ich ESXi auf die SATA Platte installieren möchte.
Oder soll ich die Platte in meinen Desktop einbauen, dort installieren und dann wieder in die Box.
Daniel, das Problem ist, dass die Grafik in N3150/J3160/J1900 Systemen nicht vom ESXi Installer erkannt wird und deswegen man nach der Meldung “relocating modules” nicht weiterarbeiten kann. Man muss aber mindestens das Management Netzwerk einrichten, das root Passwort eingeben und SSH freischalten, um das System auch ohne lokale Konsole aus der Ferne zu administrieren.
Wir zeigen hier, dass das in vielen Fällen trotzdem auf diesen sehr preiswerten Severn funktioniert.
Dafür gibt es verschiedene Möglichkeiten und insgesamt drei Blog-Einträge bei https://mobiletiger.jorba.de
–> Installation der SATA-Platte auf einem anderen, ähnlichen System, dann Platte tauschen.
–> Installation unter VMWare Player auf einen Boot-USB-Stick
–> Nutzung der seriellen Hardware-Console für die Installation
–> IPXE – Boot und Installation über das Internet (auf Festplatte)
Von ISO DVD direkt auf Festplatte installieren, klappt i.d.R. nur bei Systemen, die von VMWare freigegeben sind und auf der HCL sind (hardware compatibility list). Welcher Weg bei dir funktioniert, musst du ausprobieren, das ist vor allem eine Frage der verbauten Hardware, insb. der LAN Controller.
Hier sind die drei Artikel als Direktlinks, beachte auch die Tipps und Kommentare der Besucher:
1. https://mobiletiger.jorba.de/vmware-esxi-6-0-n3150-itx-intel-celeron-braswell-platform-problem-solved/
2. https://mobiletiger.jorba.de/install-vmware-esxi-5-5-6-successfully-on-qotom-j1900/
3. https://mobiletiger.jorba.de/instant-esxi-installation/
I using the below steps still fail in the installation
Installed PowerCli, set the ExecutionPolicy: Set-ExecutionPolicy -ExecutionPolicy Unrestricted
Downloaded the ESXi Comtomizer script and created my ISO using:
.\ESXi-Customizer-PS-v2.4.ps1 -v55 -vft -load net55-r8168,sata-xahci,net-igb
but still fail during USB install ESXi
Which method do you use?
Have you tried to install ESXi inside a VM on your destination computer?
what exactly is failing?
is it must use a vm inside the destination machine any other method to direct install the esxi to the pc ?
Direct install will fail on j1900 due to incompatible graphics.
Jon said:
So what finally worked? I have an Intel based desktop that I work on daily, and I thought „well esxi doesn’t require installing specific drivers, they all come pre installed in the ISO and at boot it decides what drivers to use, what if i stick the disk in my system and install then put the disk back?“ 20 minutes later I had a working system!
any chance to use instant install for j1900 quard lan model ?
I don’t think so
I try to install a windows then a VM player inside it
i install the ESXi inside windows on USB and it is able to boot it via VM player but fail when I close windows and boot from power up.it still loading to ESXi and fail to boot up
Can anyone help me to provide the USB boot image ?
where is the Option 4 using the modified ISO of ESXi 6 Antonio sent me?
Option 4 can be found in my first post here:
https://mobiletiger.jorba.de/vmware-esxi-6-0-n3150-itx-intel-celeron-braswell-platform-problem-solved/
Here are all the direct links to ISO files:
1. https://esxi.jorba.de/ipxe/ESXi-6.0.0-20160804001/ESXi-6.0.0-20160804001-standard-customized.iso
2. https://esxi.jorba.de/esxi6-v2-iso.zip
3. https://esxi.jorba.de/esxi65-iso.zip
Note: I couldn’t verify the last image (ESXi V6.5), because I have only one (productive) system. But I used the 6.0 image and did an successful update to V6.5.
I use the v2 iso make a USB on Windows vmplayer but still fail during standalone boot up on the quard Ethernet pc but my notebook is able to boot up?
Well a quad ethernet card seem to be a real challenge 😉
This post here was originally written by my friend Johan from Netherlands. He has such a quad eth system.
He used this trick:
1st Option (Johan):
As a sort of last resort, I started moving the Ethernet cable from one port to the next. And suddenly when I plugged in the SECOND port a new MAC addres was registered at the switch. It appeared that this was a MAC address from VMware (probably as a result from the VMware workstation installation). Opened the newly assigned IP address and there it was: the ESXi 6 status page, success!
I could even managed it using the new web based user interface. So this was the real trick: not the first ethernet port of the Qotom device is activated after an ESXi install, but the SECOND ethernet port is.
2nd option (from Jon, see comments here):
So what finally worked? I have an Intel based desktop that I work on daily, and I thought „well esxi doesn’t require installing specific drivers, they all come pre installed in the ISO and at boot it decides what drivers to use, what if i stick the disk in my system and install then put the disk back?“ 20 minutes later I had a working system!
I still not work on my system and once boot up is will show “Relocating modules and starting the kernel“
Then the cap lock of keyboard is not function and I guess the system is fail to boot any other method to know the failed item during boot up?
How long need to wait for „Relocating modules and starting the kernel“ in order to use IP to reach the ESXi?
@Andrew:
I think you should use an easy way and install your system via kickstart USB (automatic install).
1. Connect all server ports to your switch
2. Download my newest V6.5 ESXi custom file from here:
https://esxi.jorba.de/ipxe/ESXi-6.5.0-20170304101/ESXi-6.5.0-20170304101-standard-customized.iso
3. Use portable Rufus to create a bootable USB stick (size >= 8GB).
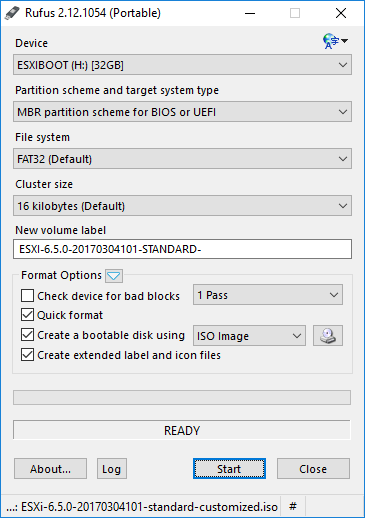
Download portable Rufus from here: https://rufus.akeo.ie/?locale=en_US
4. Download boot.cfg and ks-nowipe.cfg from my blog and copy (replace) them on the USB stick.
Download links:
https://esxi.jorba.de/ipxe/ESXi-6.5.0-20170304101/usbboot/boot.cfg
https://esxi.jorba.de/ipxe/ESXi-6.5.0-20170304101/usbboot/ks-nowipe.cfg
5. Insert USB stick into your server, boot from USB
–> BIOS needs to be setup in boot compatibility mode (not UEFI)
–> Installation will need about 10 minutes to complete, there will be a reboot
Note:
CAUTION: DATA WILL BE OVERWRITTEN on USB stick and on your server. Use at your own risk
Thanks a lot
how to clone a bootable ESXi USB?
I finally make it work with ESXi6.0 version but I want to know is it possible to clone the USB as backup
Hi Andrew,
I’m glad to hear that finally “after some hard days” you made your system up and running. Only those who do not give up, win at the end. Congratulations!
I’ll soon post a new blog entry with that USB stick installation procedure, so that also others can benefit from it.
The USB stick can be easily created “just in time” for some installation task, so no cloning is necessary, just create a new one when needed.
But .. a backup for your ESXi disk with production data is probably a good idea 😀
I assume that you have installed the system on a hard drive or SSD and not on the USB stick itself, right?
So have a look here for a free ESXi backup:
http://www.virtuallyghetto.com/tag/ghettovcb
(Of cause you’ll need some extra storage for these backups)
If I have misunderstood you and you really want to clone an ESXi instance, then look here: https://www.mattslifebytes.com/?p=473
OK, here is my kickstart description:
https://mobiletiger.jorba.de/esxi-6-5-kickstart-installation/
Finally managed to get ESXi 6.5 to play nice with my Qotom-Q190G4N-S07
here’s what i did:
using standard iso: VMware-VMvisor-Installer-201701001-4887370.x86_64.iso
installed VMware player, and hooked the SSDinto a spare sata bay. setup the VM and after remove the disk image file, and replace it with physical disk, ie; the ssd.
boot up VM, run through install, reboot, set up static IP on NIC, then shutdown.
move drive over to Qotom (either onboard sata, or as i’m doing for now, usb-sata adapter) and power on, be sure to hit Shift+O and enter ignoreHeadless=TRUE because the host boot still hangs at “relocating…” This is because, as far as i can tell, the integrated graphics on these are incompatible with ESXi, however the web interface still loads just fine.
keep in mind that the management NIC will be the second from the left, with the device’s front facing you (looking at the NIC’s that’s second from right…? just plug it into random ports until you can ping it lol)
after i got the web UI i had an error from logging in and hitting enter instead of clicking Login, which went away after updating it with to the latest fling from: https://labs.vmware.com/flings/esxi-embedded-host-client
after reboot, i also got a 503 error, but reloading it after a minute or so it went away…?
now to wait for my mSata drive to come in the mail, and build my own iso for it, should be fun.
Hi, I just purchased a QOTOM Q190G4-S02 and trying to install ESXI. I tried every sugested step on the post with no luck. Can someone pls help me. Thanks.
Hi Daniel,
can you please post some more details? What exactly is not working?
Some general hints:
First of all try my newer posts here:
https://mobiletiger.jorba.de/esxi-6-5-kickstart-installation/
It works with a newer ESXi ISO file (V 6.5) which has less problems with VGA screen and ‘relocating modules’ message ending with frozen screen.
If installation is working, but there is no network connectivity, you have to know that QOTOM Q190G4-S02 uses an Intel Quad Ethernet NIC I211-At (details here: http://www.qotom.net/goods-129-QOTOM-Q190G4+4+LAN+Mini+PC.html).
When creating a custom ESXi image, there is an article with the topic ‘Intel i211 and i350 adapters not being detected by ESXi’, see here:
https://www.v-front.de/2015/08/a-fix-for-intel-i211-and-i350-adapters.html
Hi Antonio,
is there a way that we cat set “ignoreHeadless=true” in the kickstart file?
In the installation files, edit the boot.cfg file on the line where it says:
“kernelopt=runweasel”
modify it to say :
“kernelopt=runweasel ignoreheadless=TRUE”
Save it, and now your base installer will always run with this command.
Here are some hints to make this setting permanent:
https://talesfromthedatacenter.com/2016/02/esxi-6-install-stuck-on-relocating-modules-and-starting-up-the-kernel/
When installing without kickstart, you can press tab while booting ESXi to enter this setting.
By the way, I never needed this ignoreHeadless setting 😀
Hi Antonio,
Thanks for the reply. I was able to get the ESXI installed on my QOTOM Q190G4-S02. I was missing a detail when installing the iso to the usb disk with vmware player. I was selecting the USB drive from my host pc insted of adding a USB to the virtual machine and attaching my usb to the virtual machine. Once I did it the correct way it all came together. Now I am looking a way to do a “clone”/copy my bootable ESXI USB drive. Any recommendations?
Hi Daniel,
very fine, congratulations.
You asked me, how to clone the USB boot stick.
Well, better than cloning the USB stick is doing a configuration backup, see here:
https://kb.vmware.com/s/article/2042141
A new stick is created in a few minutes, if it is damaged. I’m booting my ESXi Host about two or three times per year, so the stick isn’t used very often 😉
Some more hints:
With the kickstart installation, the ESXi Host partitions can be placed on SSD, no more stick is needed.
But if you still need to be a “cloner”, it is possible to use a standalone GPARTED live installation, to do this job. Create one, with tuxboot:
https://tuxboot.org/download/
The easiest way is the usage of linux ‘dd’ command in a root terminal session, e.g. in a GPARTED session, see here:
http://www.virten.net/2014/12/clone-esxi-installations-on-sd-cards-or-usb-flash-drives/
Hi Antonio,
I’m Francesco and I need your help 🙂 I have a J1900 device and a lot of problems installing there the ESXI, could me please suggest the right iso Image ? and help me to install? I’ve always the Kernal relocating message with all versions tried.
Many thanks